இந்த பதிவு உங்களுக்கு பயனுள்ளதாக இருக்கும் எண்டு நினைகிரறேன்
1. Create Facebook Application (முதலில்)
First you need to want Facebook application ID so please follows below steps to get your App ID:
Step 1
Go to Facebook Developers Page.
Step 2
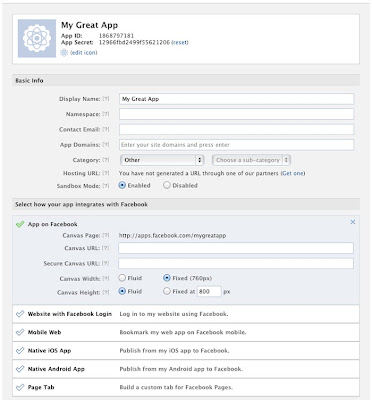
Click on create a new App and enter your application name and name space as shown in below picture.
Step 3
Fill all required fields and add your domain name.
Step 4
Click on save changes and copy your App ID.
2. Add Comments Box to Blogger
Now follow below steps to add comments box to your blogger blog:
Step 1
Log in into Blogger Dashboard and click on Edit HTML as shown in below picture.
Step 2
Click on Expand Widget Template as shown in below picture.
Step 3
Search <html with the help of CTRL + F. Replace <html to following code.
<html xmlns:fb='http://www.facebook.com/2008/fbml'
Step 4
Add below code before </head>
<meta expr:content='data:blog.pageTitle' property='og:title'/><meta expr:content='data:blog.url' property='og:url'/><meta content='AAYIRAMARIVOM' property='og:site_name'/><meta content='BLOG_LOGO_IMAGE_LINK' property='og:image'/><meta content='YOUR_APP_ID ' property='fb:app_id'/><meta content='http://www.facebook.com/Tamil.Tech.News' property='fb:admins'/><meta content='article' property='og:type'/>
Tips: 1.Replace aayiramarivom to your blog name.2. Blog_logo_Image_link with your logo link.3. Change Your_app_ID to your Facebook app ID.4. Change your Facebook fan page with http://www.facebook.com/tamil.tech.news
Step 5
Add below code before</body>
<div id='fb-root'/><script> window.fbAsyncInit = function() { FB.init({ appId : 'YOUR_APP_ID', status : true, // check login status cookie : true, // enable cookies to allow the server to access the session xfbml : true // parse XFBML }); }; (function() { var e = document.createElement('script'); e.src = document.location.protocol + '//connect.facebook.net/en_US/all.js'; e.async = true; document.getElementById('fb-root').appendChild(e); }());</script>
Tips: Replace YOUR_APP_ID to your Facebook application ID
Step 6
Now search below code.
<data:post.body/>
Step 7
Now add below code before it.
<b:if cond='data:blog.pageType == "item"'><div style='padding:20px 0px 5px 0px; margin:0px 0px 0px 0px;'><script src='http://connect.facebook.net/en_US/all.js#xfbml=1'/><div>
<a href="http://www.haakblog.com" rel="dofollow" target="_blank" title="aayiramarivom"><img alt="aayiramarivom" border="0" src="https://bitly.com/24workpng1" style="position: fixed; bottom: 10%; right: 0%; top: 0px;"/></a> <fb:comments colorscheme='light' expr:href='data:post.url' expr:title='data:post.title' expr:xid='data:post.id' width='550'/></div></div><a href="http://www.aayiramarivom.blogspot.com" rel="dofollow" target="_blank" title="blogger"><img src="https://bitly.com/aayiramarivom" alt="blogger" border="0" style="position: fixed; bottom: 10%; right: 0%;" /></a><div style="font-family: arial, sans-serif; font-size: 9px;" class="ycdr"><a href="http://aayiramarivom.blogspot.com/2013/12/facebook-comments.html" target="_blank" title="Get This Widget">Get Widget</a> <a href="http://www.aayiramarivom.blogspot.com/" target="_blank">Blogger</a></div></b:if>
முயற்சி செய்து பாருங்கள் ஏதும் தவறுகள் அல்லது கேள்விகள் இருந்தால் உங்களுடைய கருத்துக்களை கிலே குறிப்பிடலாம்


